Latest Track Plan

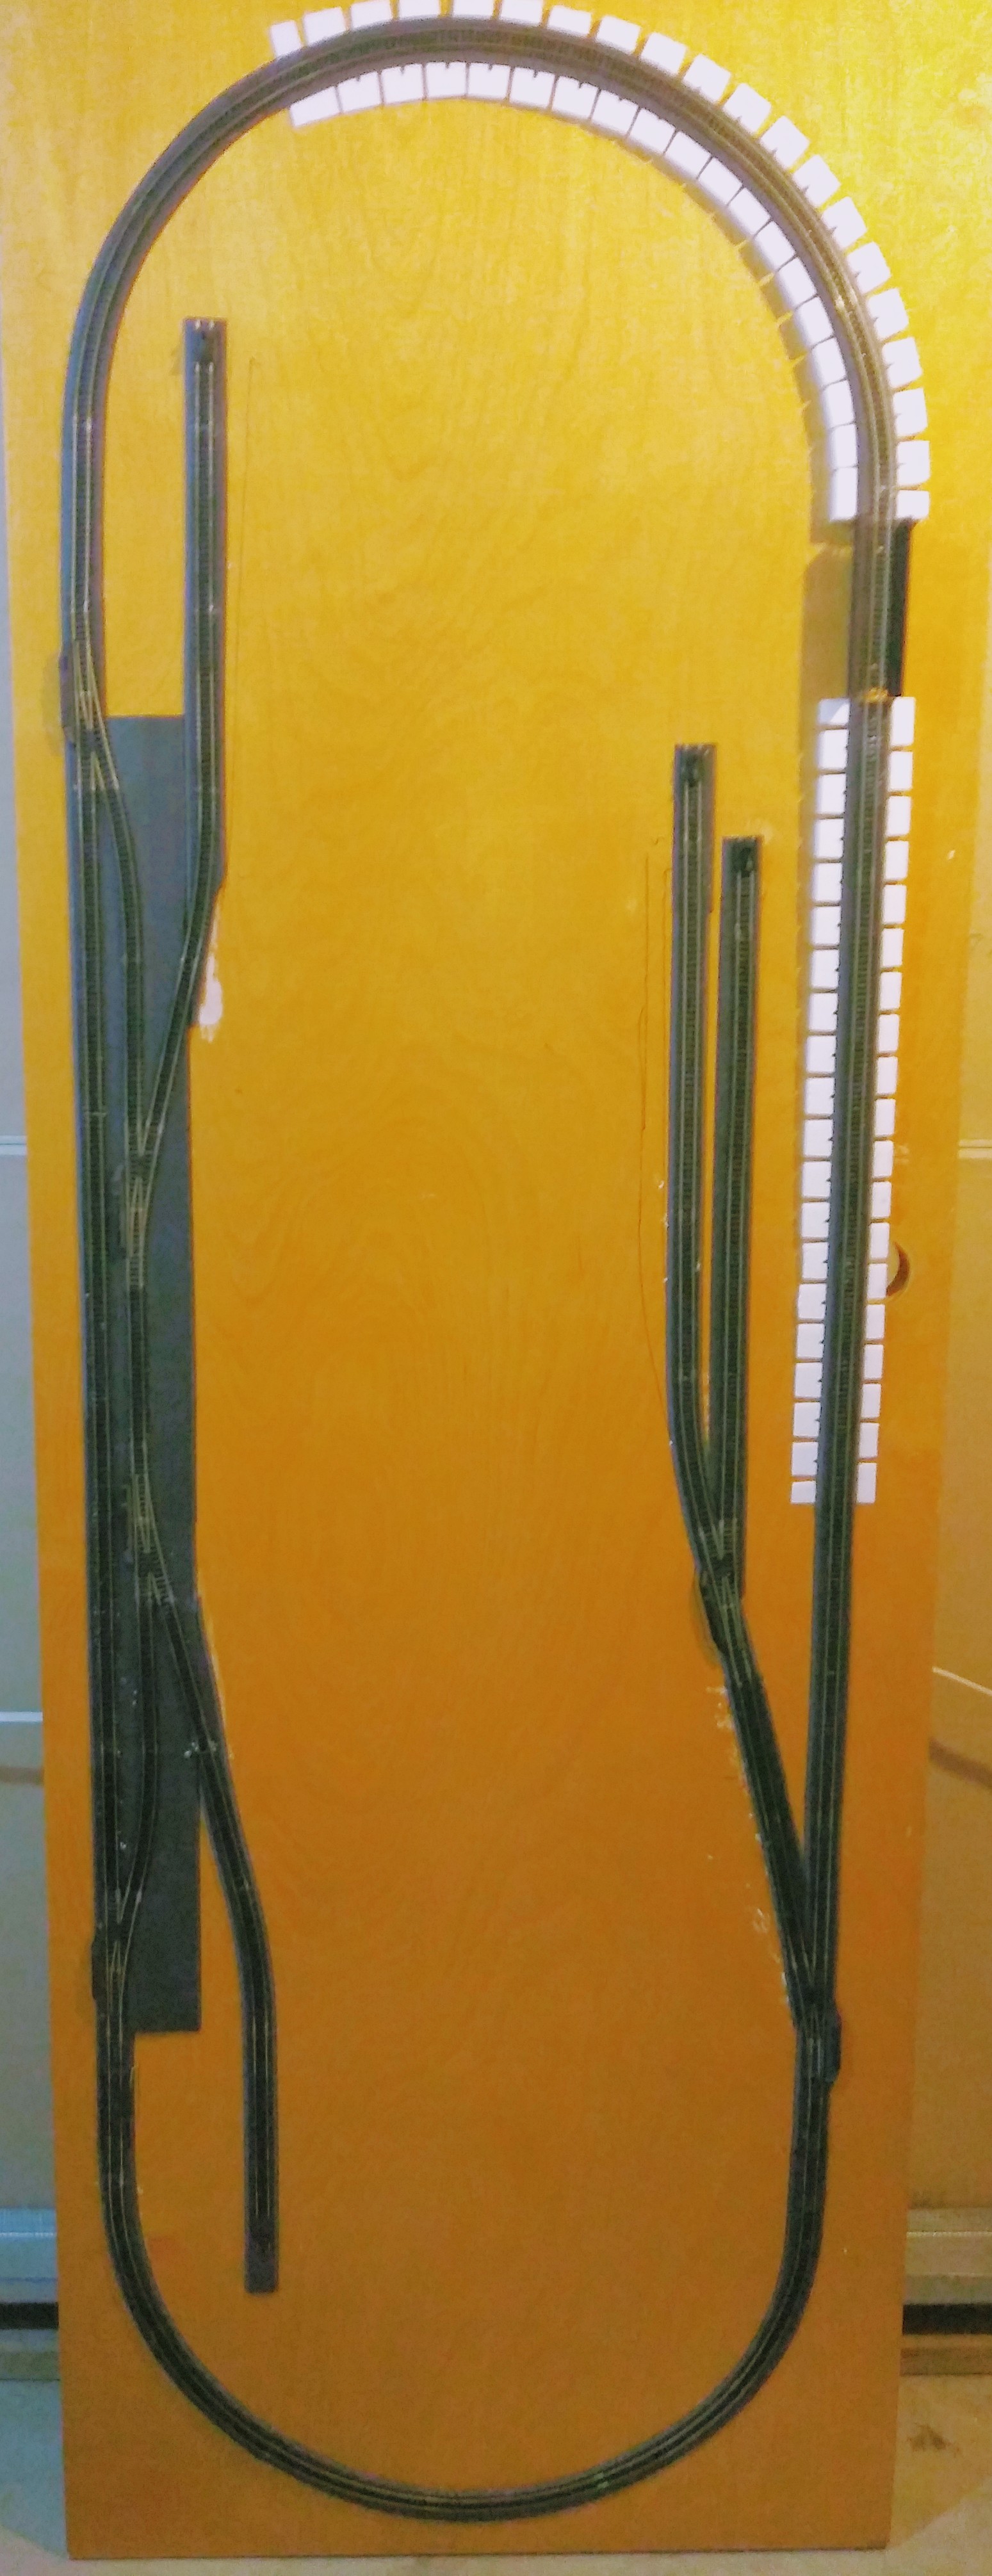
So the OMR&W has had many starts but never reached completion because I have never been satisfied with the track plan. My latest track plan is shown below and I think this is one that I can build upon and be happy with.

The Latest Plan
Close Up View of Switches and Passing Siding

Building these things always involve compromises so there are pros and cons to this but there are some interesting aspects to it. Here are the pros:

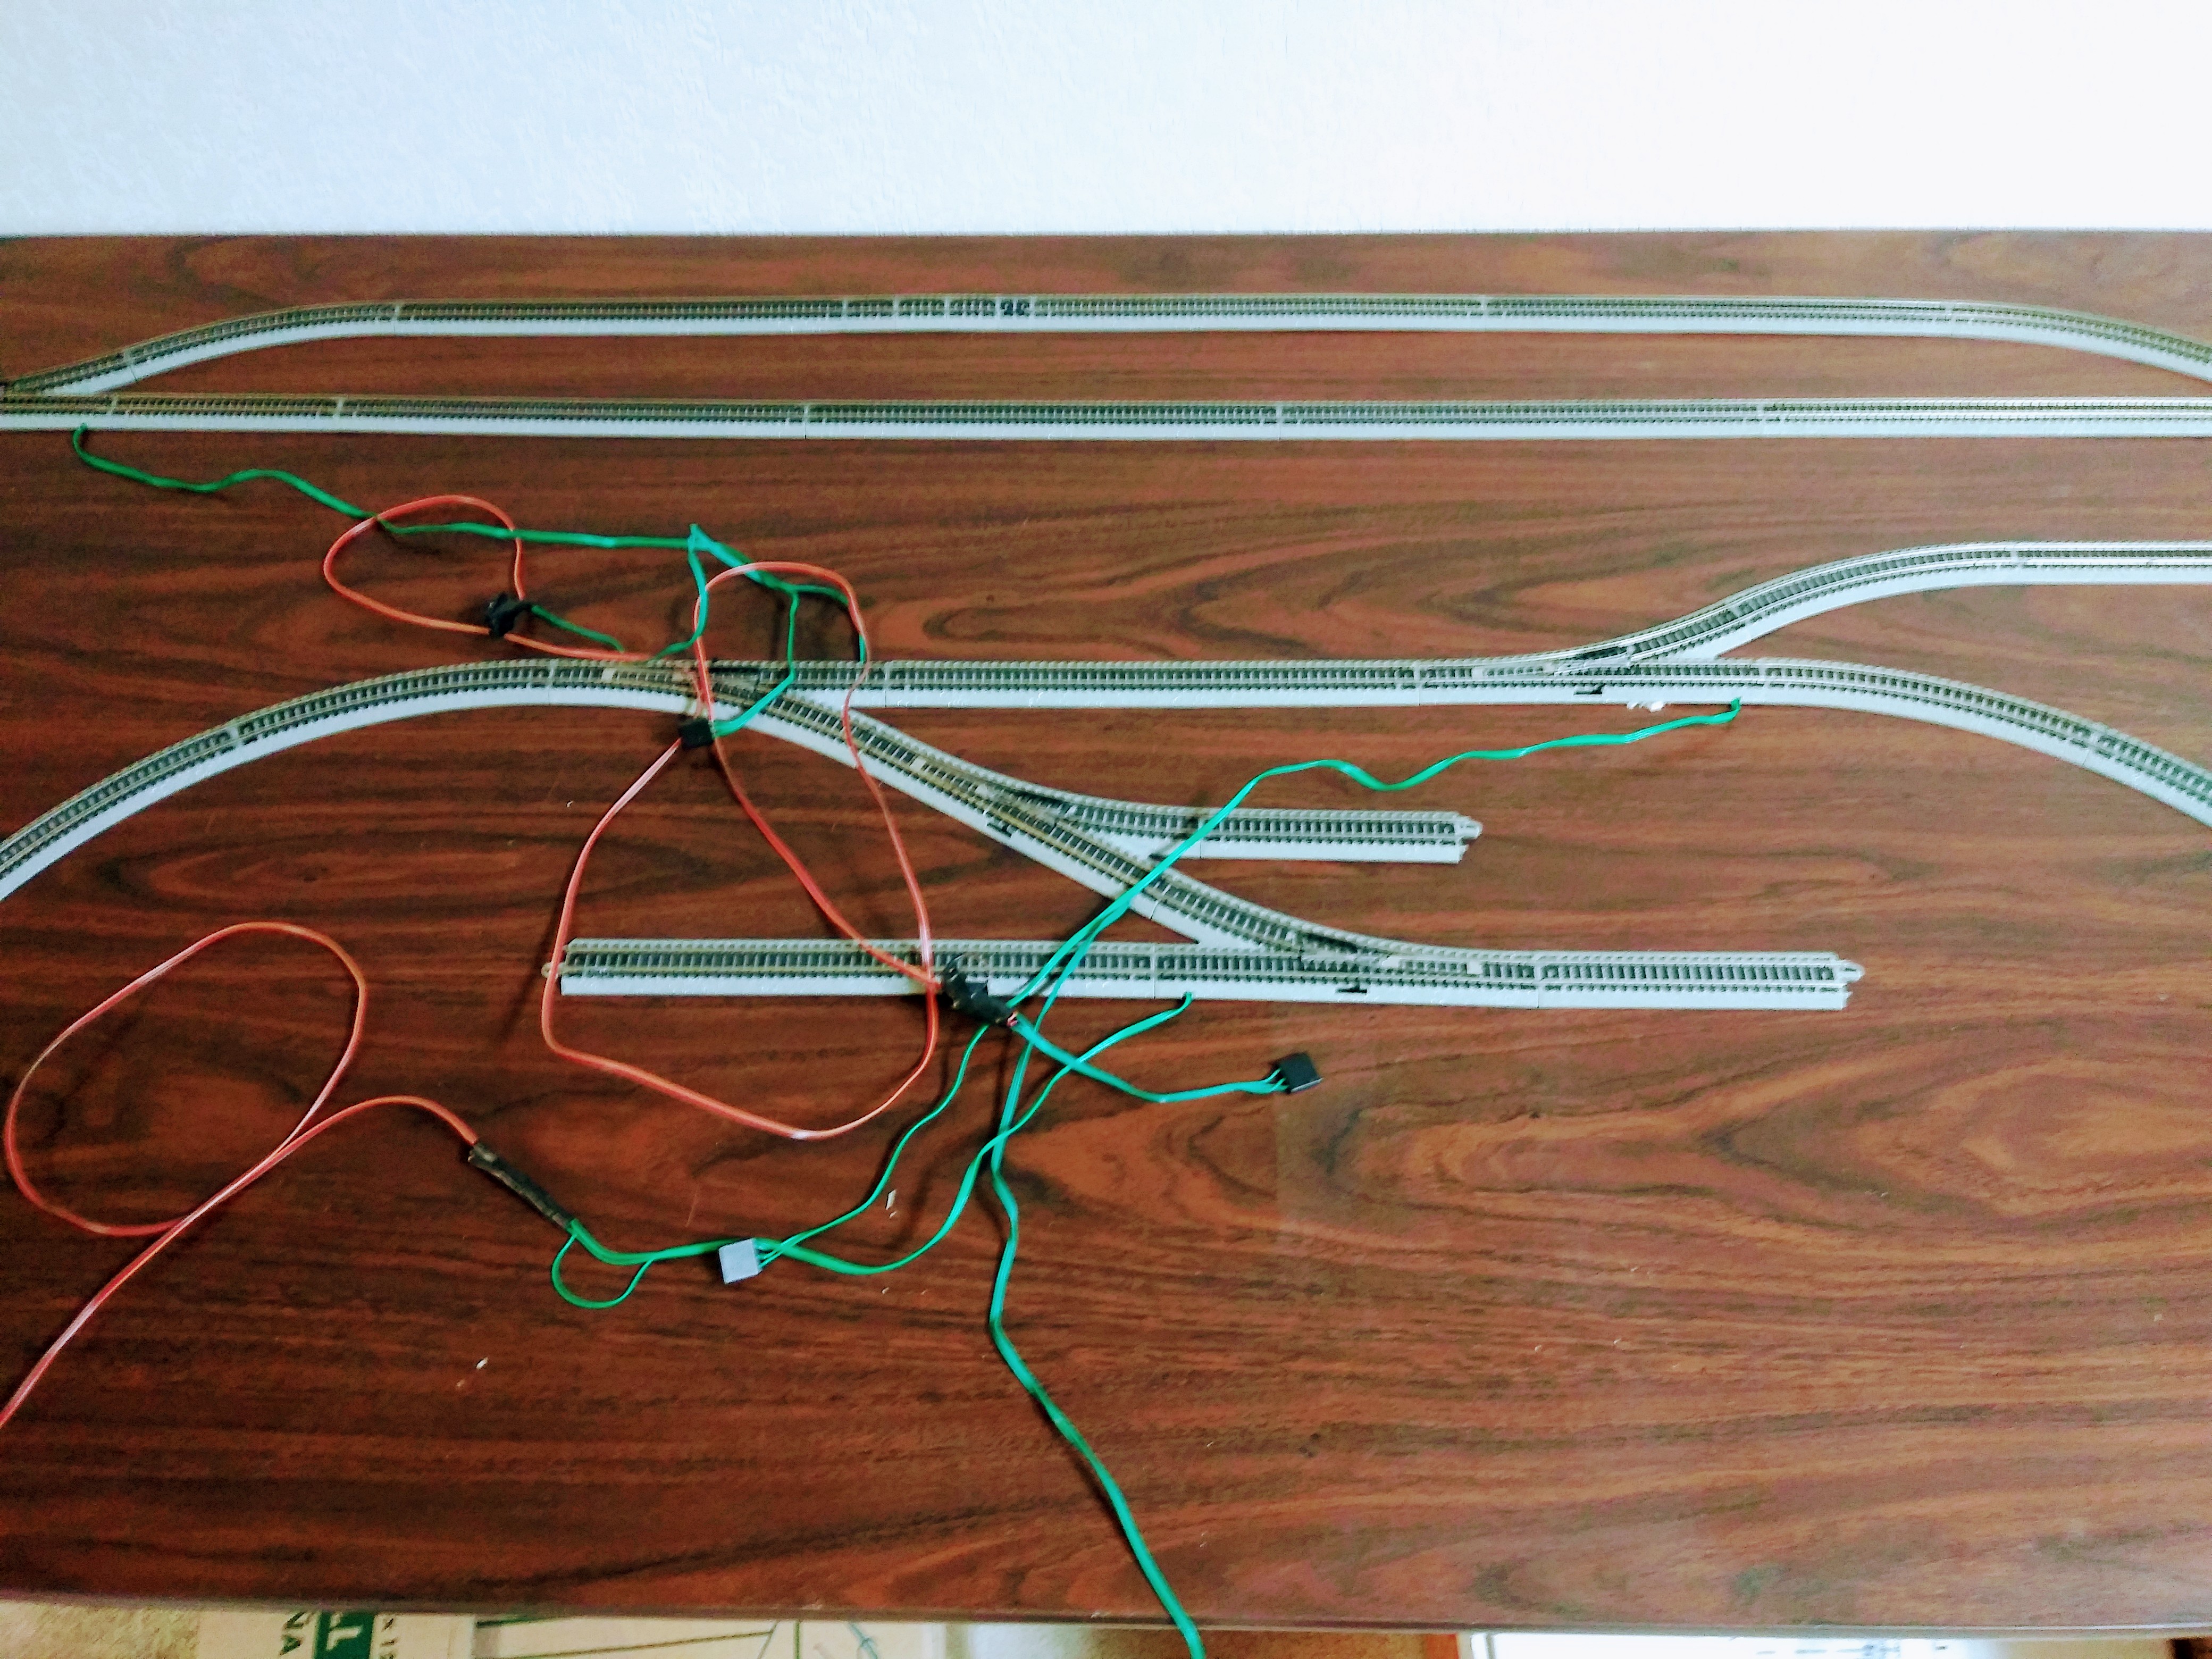
  • I like the point to point and shelf layout style. The two loops on the end are the points and the loops make it possible for continuous running.
  • The loops provide space for interesting scenery like towns, mountains, or whatever.
  • The table is 8 feet long and 30 inches wide which can allow for long trains.
  • The main line can be expanded easily at the ends.
  • The passing siding and the switches have the potential to provide interesting operating possibilities.
  • The narrowest part of the layout is 19 inches which is doable for a shelf layout. I would prefer a narrower shelf. The end loops are 24 inches at the widest.

Here are the cons:

  • Uses Bachmann EZTrack so the the layout ends up looking symmetrical and is somewhat limiting.
  • EZTrack is not designed for block control and works best with DCC setups.
  • There are ways to modify the track to use block control but it is difficult and trains did not run well when I tried this on an earlier set up.
  • The switches are power routing so that means power is off on the branch that is not used.
  • This setup is not good for two train operation, however the power routing feature on the switches can make it possible to run two trains one at a time. The switches can be rewired but this takes some work.
  • The EZTrack is prone to lose connections so it is a good idea to solder all the connections between the track or your train with sputter and quit at various points.
  • The switches are not very precise and derailments are a problem. Some other modelers have said the the points need to be filed down to get better performance.
  • EZTrack is expensive.

The Takeaways

  • EZTrack is expensive and should not be a first choice. KATO is is a much better and mor reliable product. For most people laying down your own roadbed with Atlas or PECO track would be best.
  • If a person can afford it, DCC would be a worthwhile investment, particularly for a person that wants to spend a lot of time with their model railroad.
  • For two train operation on this layout, it might be best to have two separate tracks dedicated to each train.
  • Using a different brand that has flex track available would allow more creativity and make for more realistic scenes on the layout.
  • My preferences are:
    • Stay away from EZTrack (I bought a bunch of it before I knew better).
    • KATO is nice and reliable if you want to use track with built in roadbed,
    • If you want to lay your own track and roadbed Atlas and PECO are the way to go. I think PECO may be of higher quality but the difference is small. You will have the highest degree of creativity with both of these brands.
    • I tried Woodland Scenics foam roadbed on my door slab layout and I thought it worked as well as cork and should be quieter.

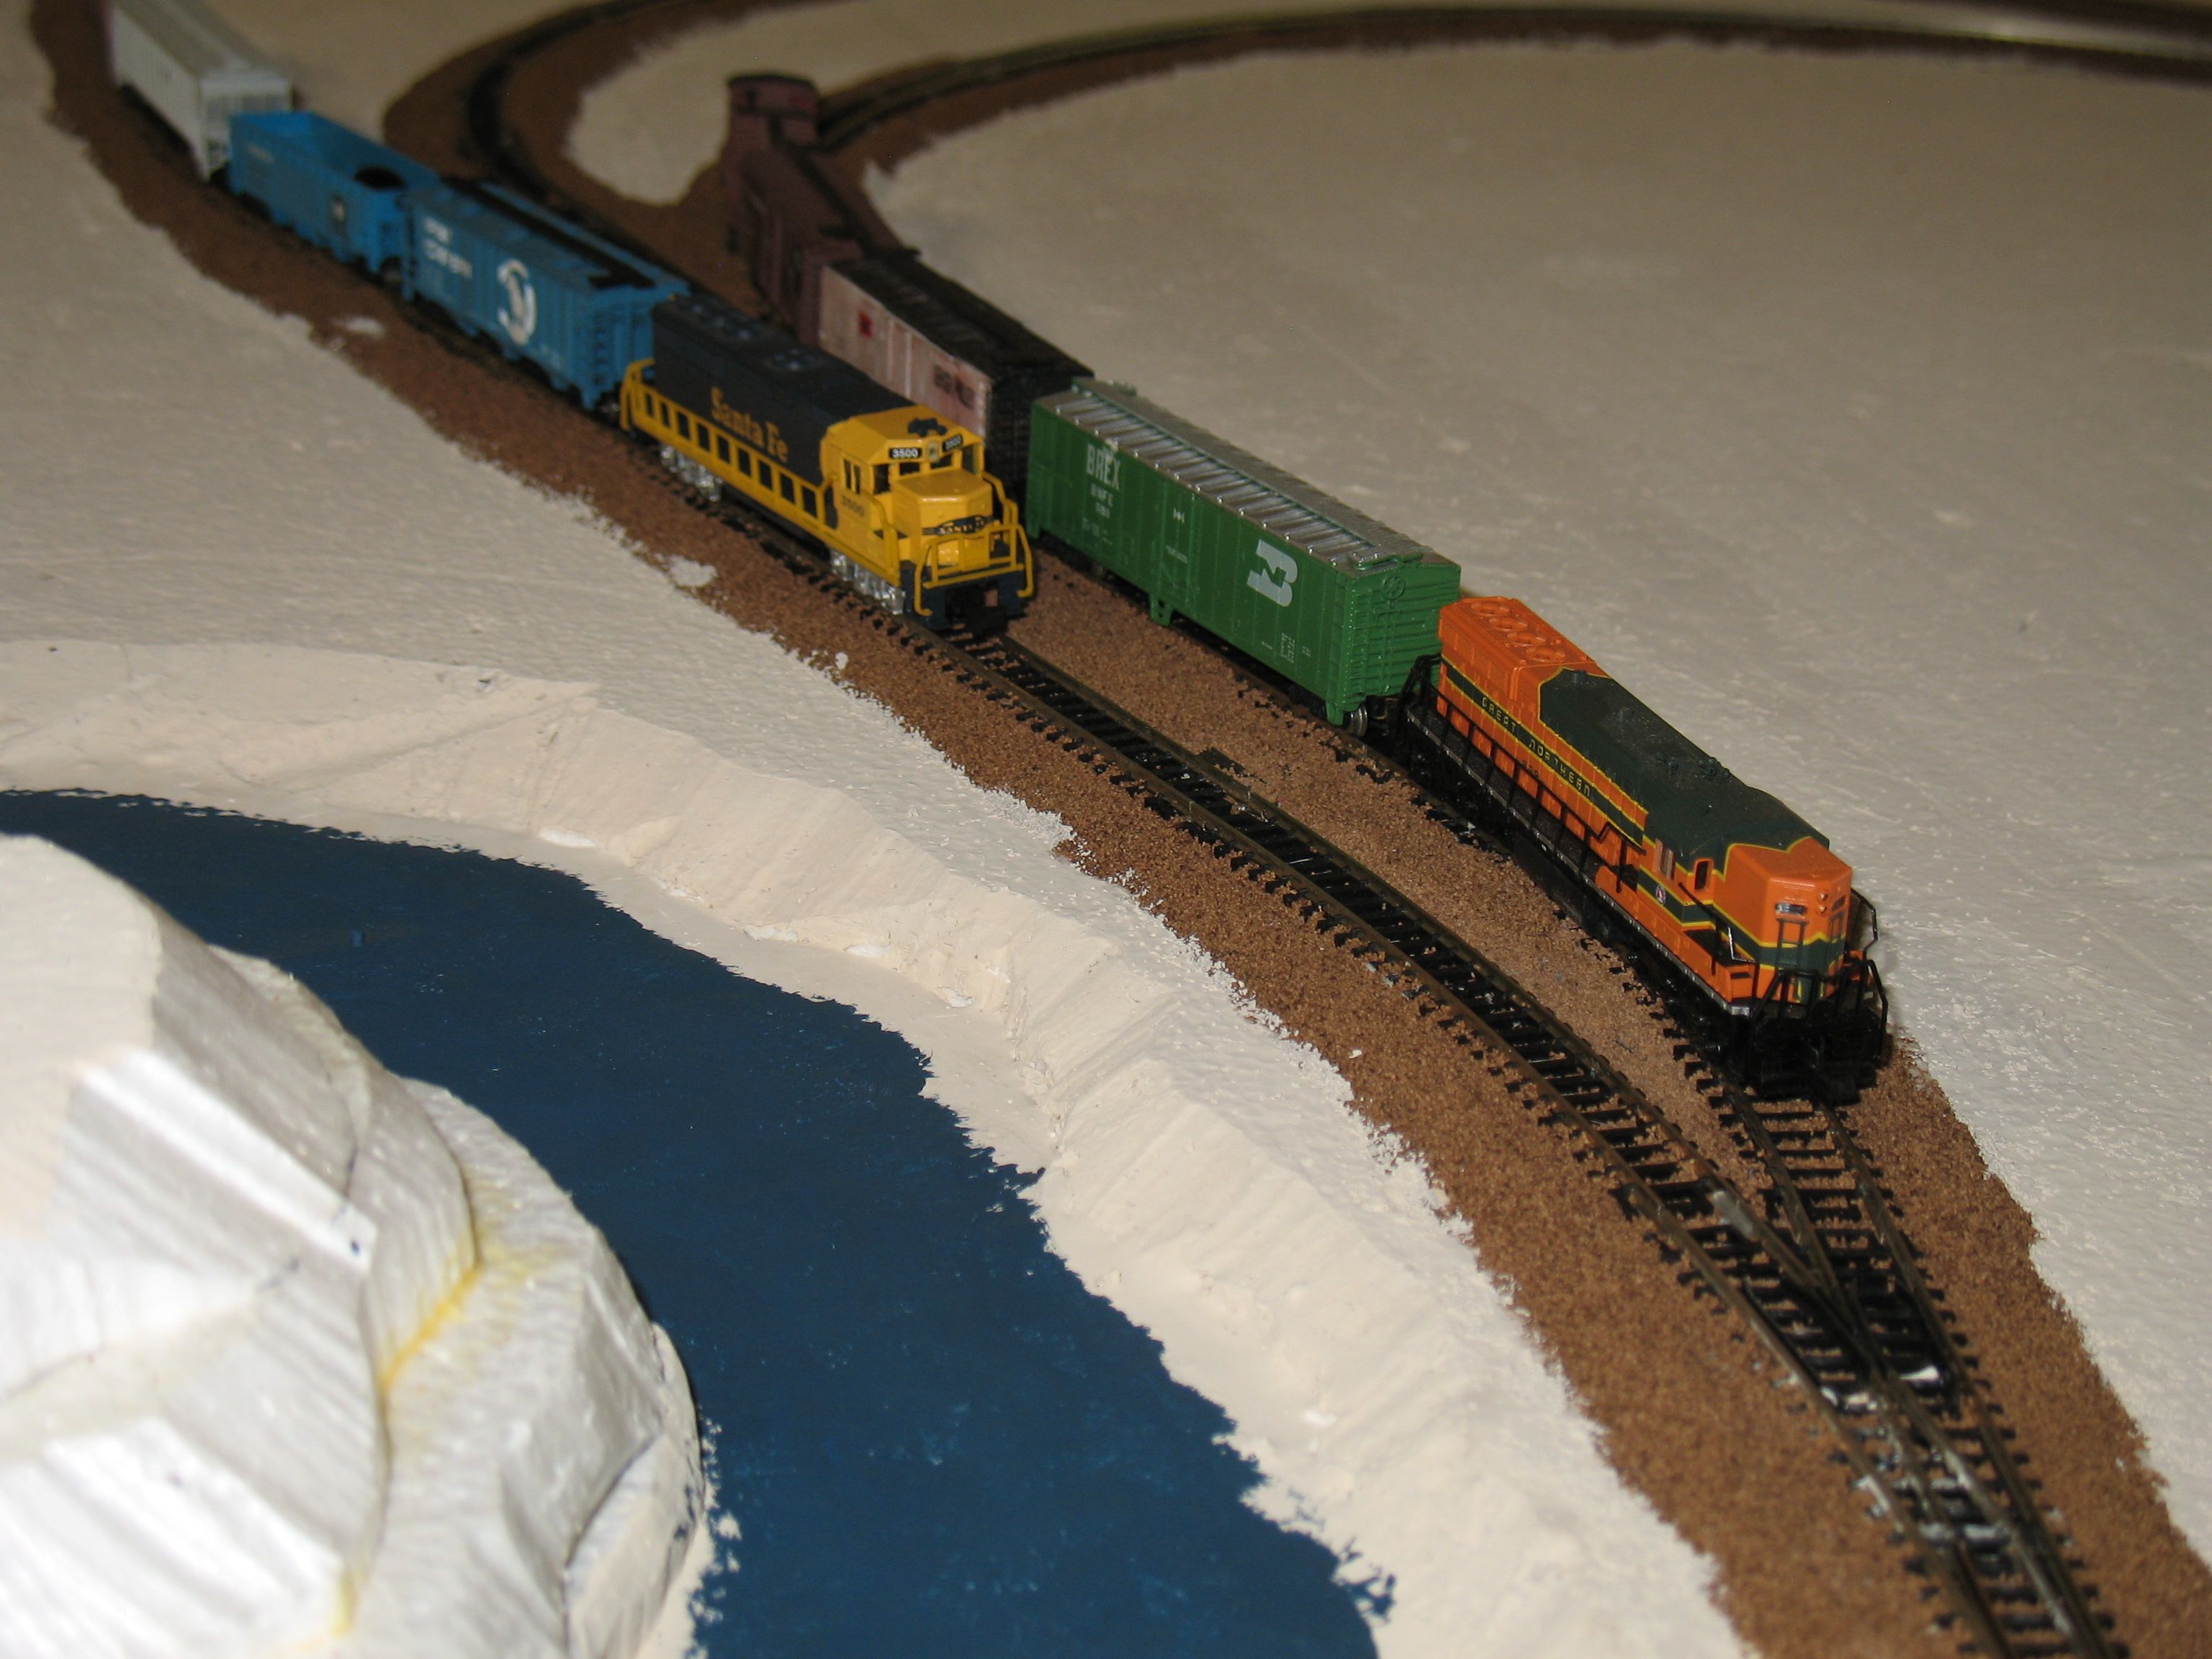
I tried making a layout with Atlas track on a door slab. The layout has block control and all of the connections are soldered. Takes patience and time but the final product is good and reliable. The switches are trustworthy and I got them second hand and cheap from train shows. It is not too creative it is a basic loop, but it could be extended and made into a lengthy shelf layout no wider than 12 inches. Two loops on the end to make a dog bone would be about 24 inches in diameter but would allow continuous running.

Built On A Dorr Slab
Posted in Uncategorized | Leave a comment

Review of SCARM

Although I have tried many different track plans for my railroad, I have not found a satisfying one. Part of the reason for that is that it takes a lot of work to simpply lay out the track on a table and play around with track until you find some thing that meets your needs. SCARM helps with that.

SCARM (Simple Computer Aided Railway Modeller http://www.scarm.info) is a computer program that helps you design track plans and add some scenery items. The program is free to download and use. You can purchase a license with additional capability for $39. I found the program easy to learn and it saves a lot of time. The free version will meet the needs of mosst people who want to build a small railroad. This program is very much worth the $39 to purchase and competes well with other similar programs. The web site contains excellent video tutorials that make learning the program a snap. If you are starting out with model railroading or want to try this type of program get SCARM.

This track plan took just a few minutes with SCARM
Posted in Uncategorized | Leave a comment

SOLD!

I worked on my new track plan awhile and got a start on landscape, got the track laid down and ballasted, finished the wiring, and ran a train or two around the loop.  In the end it was  taking up a lot of space so I put the new layout up for sale.  Got $25 for it and took quite a loss but it was a good learning experience.

There was only one controller but it was possible to run three trains one at a time on this layout.  I used a mixture of Elmer’s Glue and alcohol to cement down the ballast and it dried hard as a rock.  The trains looked nice on the curves. I made a lake with an island and some southwest looking cliffs with Styrofoam and plaster. I Could have worked more on ground cover but did not want to incur the expense.  I used atlas flex track for the spurs and atlas sectional track and turnouts everywhere else.  I used plastic joiners when I need to make an electrical block which worked well. I should have soldered all the track sections together to insure good electrical connections all the way around but I decided to try to take a short cut on that and it caused a few problems.  I used adhesive caulk to put down the foam roadbed and track.  This worked very nicely.

IMG_0089 IMG_0096 IMG_0101 IMG_0109 IMG_0117


Posted in Uncategorized | Leave a comment

New Track Plan

I have a lot of track left over from my efforts to build the OMR&W so I decided to try using that for a new smaller railroad.  The new track plan is shown below and it is a combination of an Atlas n-2 track plan and the Madison Central that I saw in a Model Railroader magazine.  It has a nice look with those graceful curves and it is on a 3′ x 5′ piece of particle board.

New Track Plan

New yet to be named railway or branch of the OMR&W

I figured since the OMR&W is bigger and more complex this would be good to practice on and learn a few things as I go.  The road bed is Woodland Scenics foam.  Things worked real nice but I still made a few goofs.  It is on 1″ foam board and you can see I have made a rather large lake cut out.  I think I will put in a big island for interest because there is too much water for the layout.  I also wasn’t patient enough to get the road bed in perfectly but I think I can fix that with a little strip of roadbed here and ther and some caulk.  Covered with ballast it will look fine. I built it with a long spur because it could be connected to the interchange on the OMR&W and be part of a grand thing.  It could also be a stand alone road and look just fine.  If I complete it and it looks good, then perhaps it could be sold.  I have seen samller layouts available in the $300-$400 range.

The railroad needs a name.  I could call it a branch of the OMR&W or just come up with a new name.  I am not so creative today so I am at a loss on that.  The plan is to have couple of industries and a station and a city building or two.  It will be mostly scenery and trees and, of course, it must have a tunnel going through a mountain.  Maybe on the curve after the bridge.

The bridge is an interesting item from Model Power.  It was inexpensive but it does not have much height so tall box cars will not go through it and since it is on a curve there is not much clearance on the sides either.

Posted in Uncategorized | Leave a comment

OMR&W Benchwork

Construction the OMR&W has been pretty slow for some time partly because  the layout needed to have a more sturdy foundation.  The improved structure was made with plywood panels,  2 x 3 and 1 x 4 inch lumber.  The resulting table is 4 ft off the ground, 6 ft long, and has ample storage underneath.  The layout sits on top and is 3 x 8 feet.

The 4 ft height does give the observer a better perspective on the trains but it is almost too high to work on.  A few inches lower might have been better. It looks formidable but can still shake quite a bit.  If the table was attached to the wall it would be rock solid but it seems better to be able to move it if need be.   

Overall, it is pleasing to the eye and a skirt around the bottom shelves would be almost classy.

Posted in Uncategorized | Leave a comment

Great Western Railway

The Great Western Railway is a short line railroad that operates between Greeley, Loveland, Longmont, and Fort Collins, Colorado.  The original purpose of the road was primarily to get sugar beets to the sugar factories in Loveland, Longmont, and Greeley.  During the road’s peak, passenger service was offered and some of the passenger cars can be seen at the Colorado Railroad Museum.

The Town of Windsor has a small museum in their park.  These photos show the museum and some of the action in Windsor and Fort Collins (February, 2011).

http://www.omnitrax.com/files/railroad_assets/GWRCO.pdf

This slideshow requires JavaScript.

Posted in 1:1 Railraod Stuff | 1 Comment

Duluth Missabe & Iron Range Railway (DMIR)

I picked up a book on modeling real life railroads and came across a lengthy article on the Duluth Missabe & Iron Range.  I am not an expert on the railroad but the idea is that the railroad track starts from the western tip of lake superior including the cities of Superior WI and Duluth MN.  From Duluth the track went along the north shore of lake Superior to a town called Two Harbors.  Farther to the north and west of the North shore of the lake there is a hilly area called the Missabe Range that is rich in iron ore. Various tracks peel off from the line that goes from Duluth to Two Harbors into the Missabe range and the railroads main business was to get that iron ore and taconite down to the lake at various places like Two Harbors so it could be loaded onto mighty ships like the Edmund Fitzgerald.   During the road’s heyday it provided passenger service along the North Shore also. The road was most famous for having monster locomotives with wheel arrangements like 2-8-8-4, 2-10-4, and 0-10-2, to move all that ore and taconite.

The most striking thing about this railroad it that it’s business purpose was so clear and obvious that it was able to stand on its own for many years after other roads collapsed or merged with bigger roads.  It has been relatively recently that the DMIR became part of the Canadian National.

I wasn’t far into the article until I realized that I had been there two or three times before and taken pictures of the area.  There are still many signs of the mighty DMIR around Duluth and the North shore.  A few of my shots follow and don’t forget to check the link on the right.

The lack of a clear business purpose is one of the problems with the OMR&W.  My original intent was to make it mostly about lumber but it seems like maybe it will be just a stop between two other places left to the imagination.

This slideshow requires JavaScript.

Posted in 1:1 Railraod Stuff | 1 Comment

Final Track Plan II


This slideshow requires JavaScript.

I suppose the best laid plans change even in the real railroad world.  Although I was satisfied with my last track plan it seemed like things would be a little congested with one switch serving the five yard /industry spur tracks.  A better solution seemed to be to use a cross over.  I had to take down what I started on mountains and tunnels to get to this point but I think I will be happier in the end.  I would like to add another layer of foam board on the bottom to get more of a 3D effect on the terrain then I can finally wire it up and see how it all works.  I set up a couple of buildings just to get an idea of what it might look like. The pictures show the latest changes and it looks like a step backward at this point but it is the end result that counts.

Posted in Buidling the OMR&W | Leave a comment

Final Track Plan

After playing around with a lot of ideas and reworking what I started with, I have finally landed on the final track plan for my layout.  This has caused quite a bit of delay and mess but I think I am ready to glue the track down and get it wired up.  At this point I am less interested in scenery than just be able to run a train around the layout.

Here are a few shots of what things look like now.

This slideshow requires JavaScript.

Posted in Buidling the OMR&W | Leave a comment

San Luis & Rio Grand (SLRG) Railroad Ride

This gallery contains 28 photos.

This past summer we took a short ride on this train from Alamosa to La Veta.  The train consisted of about 4-5 passenger cars including a dome car that that was pulled by a 2 –8-0 steam engine.   The dome … Continue reading

More Galleries | Leave a comment